
Hands-on with Sitecore Helix: Continuous Delivery with Octopus Deploy
In my previous post I described how to setup an automated build for a Sitecore Helix project.
In this post I’ll be covering the configuration of the automated deployment environment using Octopus Deploy.
Octopus Deploy
Octopus Deploy uses the following terminology:
- Environment ; a collection of one or more machines where a release can be deployed to (e.g. Acceptance, which contain two machines, ACC-CM and ACC-CD).
- Machine role ; describes the role of a machine (e.g. ContentManagement or ContentDelivery).
- Tentacle ; an Octopus service agent running on a deployment target under a specific machine role. The agent communicates with the Octopus server and executes certain deployment steps (e.g. install packages/run scripts).
- Lifecycle ; determines the order of promoting a release from one environment to the next. (Also contains the retention policies for the releases.)
- Project ; contains the deployment process, the releases and variables.
- Deployment Process ; a sequence of steps which controls the deployment of your application.
- Variables ; allows the use of variables in deployment steps. This is useful for values which differ between environments or machine roles.
- Release ; a version of the deployment process and associated variables.
Octopus Deploy has great documentation
so I won’t be covering all the details.
I will discuss the Octopus Deployment Process and Release since these have Sitecore (Helix) specific configurations.
Deployment Process
A deployment process consists of deployment steps. A step is based on a step template and Octopus provides an
extensive library of those.
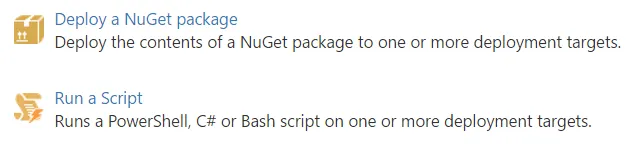
The step templates which I use most frequently are Deploy a NuGet package and Add a Script:
The deployment process for our Sitecore Helix project is constructed as follows (PS for Add a Script step, NuGet for Deploy a NuGet package step):
- IIS AppPool - Stop (PS)
- Remove Unicorn yml files, module configs and module binaries (PS)
- Deploy
<Project>.Foundation.<FoundationName>(NuGet, separate step for each Foundation module!) - Deploy
<Project>.Feature.<FeatureName>(NuGet, separate step for each Feature module!) - Deploy
<Project>.Website(NuGet) - Copy Unicorn yml files to Data folder (PS)
- Remove Unicorn yml files from Website folder (PS)
- Disable/enable config files (PS)
- Update config values (PS)
- IIS AppPool - Start (PS)
- Sync Unicorn items (PS)
- Send notification to Slack (PS)
The Remove step (2) is recommended because each deployment will only add new files to the website.
We’re not installing a vanilla Sitecore from scratch each time.
By removing module specific files such as yml, config files and assemblies we can ensure we won’t get unexpected behaviors when files (or complete modules) are removed from the build.
PowerShell
PowerShell steps can use (custom) script modules from the Octopus Library.
This allows re-use of script code and keeps the PowerShell steps succinct and easy to understand.
The following custom made modules are used:
- Remove folder content ; used in step 2 and 7
- Copy folder content ; used in step 6
- Disable and Enable Config files ; used to enable disable CM/CD specific configs in step 8
- Update file content ; used to replace environment and machine role specific tokens in config files in step 9
- Sync Unicorn ; used in step 11
The Disable and Enable Config Files module is useful when dealing with separate content management and delivery servers.
I plan to write a blog post about that one separately and to submit the script to the Octopus Library eventually.
Release
I’ve setup the release versioning to use the latest available version from the NuGet packages:

A release can be created automatically when Octopus detects a new package being pushed to its NuGet feed.
This is configured by selecting a NuGet Package deployment step from the process.
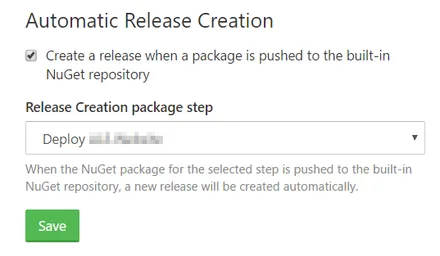
Although this functionality sounds great I would recommend not to use this when dealing with multiple packages!
When I tried this automatic release creation I experienced that releases often would contain old versions for some packages.
This discrepancy was caused by new packages not being available yet on the Octopus NuGet feed when the release was created.
Octopus triggers the release creation based on one NuGet package while a Helix solution will produce many packages (in this setup).
So if the package referred to in the Release Creation package step is not the last package to be pushed by the build server a release will be created in
Octopus which still refers to some old packages. Yikes…
Since the build order of the projects (and thus the push of the packages to Octopus) might change it is too risky to have the release created automatically
based on the presence of one package of which you assume is the latest in the build process.
Octo.exe
It is much better to trigger the build by running a command line tool called Octo.exe.
This tool needs to be installed on the build server and a post build step needs to be added which calls Octo.exe with the following arguments:
create-release --project <PROJECT_NAME> --version <RELEASE_VERSION> --packageversion <PACKAGE_VERSION> --server <URL_OCTOPUS_SERVER> --apiKey <OCTOPUS_API_KEY> --releaseNotes "Some notes here about the release"
Let’s have a look at the available argument switches:
--project <PROJECT_NAME>specifies the project name in Octopus Deploy to create a new release for.--version <RELEASE_VERSION>sets the version of the Octopus release (optional).--packageversion <PACKAGE_VERSION>defines which version of the NuGet packages will be used in the release (optional).--server <URL_OCTOPUS_SERVER>specifies the Octopus Deploy server URL.--apiKey <OCTOPUS_API_KEY>specifies the API key which is required to execute the create release command.--releaseNotes "Some notes here about the release"Optional switch for the release notes.
I’ve omitted the --versionand --packageversion switches in the post build job since I let Octopus determine the release number based on the latest NuGet package version available.
And since all the NuGet packages are built with the same version number this is safe to use.
An alternative of using the command line tool would be to use the Octopus REST API.
The OctopusDeploy-API GitHub repo contains loads of PowerShell scripts on how to use the REST API.
Multiple NuGet packages: The good, the bad and the ugly
As described in my previous post I took the approach of having NuGet packages built for each module (csproj) in our solution.
The reasons behind this were the following:
- It is transparent which modules get deployed since that is explicitly configured in the deployment process.
- You have control over which modules will be deployed. There is the option to skip modules but this does introduce a big risk when there are dependencies between modules, so be very careful!
The multiple package approach also has some drawbacks:
- Many of the created NuGet packages use the same dependencies (e.g.
Sitecore.*.dll) which means that there is a lot of duplication of referenced assemblies in these packages. Therefore the total size of the multiple NuGet packages (one for eachcsproj) is much larger than the size of just one NuGet package for the whole solution. You need to be alert of setting up retention policies on OctopusDeploy and the Tentacles to prevent disk space filling up rapidly (you need to do this anyway but it becomes a problem earlier with many packages). - When a new module is added to the Visual Studio solution, the deployment process also needs to be updated with an additional NuGet package deployment step. So you actually have a dynamic deployment process which you need to actively maintain. There are ways around this by using a custom Powershell script (see the final section of this post).
- Because there are more packages to deploy the process also takes longer to complete. So if you don’t use a blue-green deployment
strategy you have a longer downtime. The deployment process we have in place now takes about 20 minutes to deploy 48 NuGet packages.
Moving forward
Will I use the exact same packaging & deployment strategy for the next Sitecore Helix project?
Probably not. Although I do have (almost) everything in place now I’m not 100% satisfied with the current deployment process.
I don’t like the fact that whenever a new module has been built a deployment step needs to be added to the Octopus process.
Since adding a deployment step is still a manual procedure it might be forgotten and a module will not be deployed. This is quite big risk.
I’m planning to write a PowerShell script that will locate NuGet packages within Octopus based on a naming convention and deploys these to a configurable target.
Then all the current deployment steps for the Feature modules can be replaced with one PowerShell script step that will search & deploy packages matching <Project>.Feature.*.nupkg.
The Foundation modules can be handled in the same way.
By just using one NuGet package for the entire solution I wouldn’t have this problem to begin with (but I’m sure I would have had other problems then 😉.
But which ever route you take for you next Sitecore project, make sure you use a deployment environment such as Octopus because it enables very controlled and reliable deployments.
Feedback
I always appreciate good feedback, so feel free to leave a comment here or discuss this in the helix-habitat channel on sitecorechat.slack.com.