
Hands-on with Sitecore Helix: Setting up automated build and packaging for continuous delivery
In my previous posts I’ve shown how our team is able to add new feature or foundation modules easily.
Now let’s take a look at the effect of the modular architecture on the build and packaging of a Sitecore Helix style solution.
This is a topic which is receiving loads of attention lately and has been blogged about before by other Sitecore community fanboys 😉.
First I need to make clear that the solution I will describe is just one of many approaches that can be taken.
It is meant to provide insights in the possibilities of building and packaging your Sitecore Helix solution.
I will share my concerns of this solution in my next post.
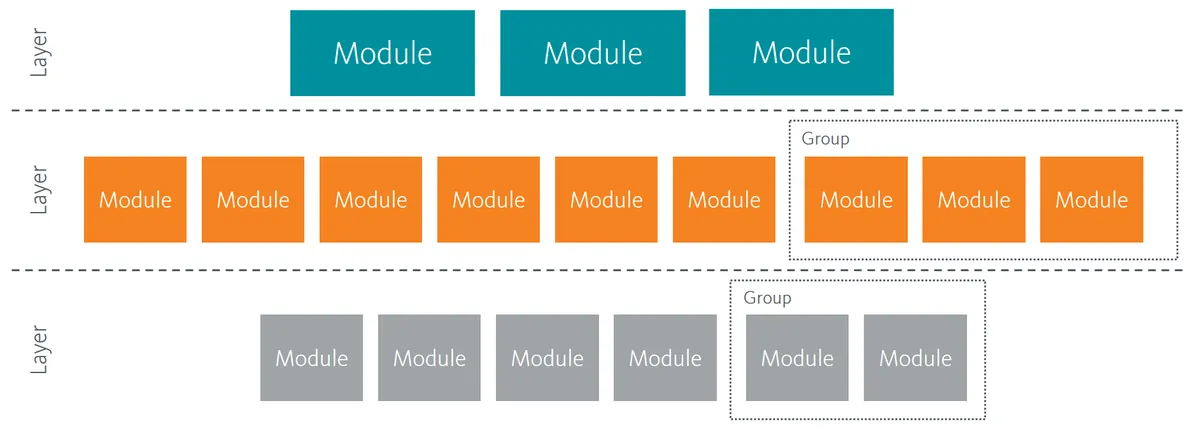
Modules, Modules Everywhere!
Carefully read the following paragraph from the Helix Architecure Principles:
“Keep in mind that in Helix, modules are business-centric. This means that they should relate to business objectives and group together multiple technology entities that refer to this objective.
This principle goes against many traditional software conventions - such as the ones dictated by MVC (models, controllers and views) or even Sitecore (templates, layouts, settings) - that define grouping based on their type, rather than their business objective.”
The Sitecore Habitat solution currently consists of:
- 16 feature modules
- 14 foundation modules
- 2 project modules
The Visual Studio solution has 54 projects (incl test projects) in total.
The real world Sitecore project I’m working on at the moment has even more.
It is definitely a mind shift to work with large numbers of projects.
Be cautious not create a module for each user story on your backlog though.
You can of course group or consolidate components which are very similar into one feature.
Performance vs Clarity
Some people are against this high number of projects in one Visual Studio solution.
Although a large number of projects does have a negative impact on Visual Studio performance I encourage the usage of this pattern.
This is because the clarity of this modular architecture outweighs the performance issue.
Identifying modules is so straightforward now and this greatly helps the communication about these feature and foundation modules.
As a developer you really need some decent hardware to make this work efficiently in Visual Studio.
If your development machine is slow, do some calculations so you can make a business case which supports your request to get a new machine.
So what do you need to do when you have a whole team producing loads of modules? Well, build & package those modules in order to deploy to other
environments of course so testers and end-users can marvel at your work.
Continuous Integration & Delivery
You are all using source control and a centralized build environment, right?
Currently I’m using GitLab for source control and Bamboo as the build environment.
Although Bamboo is not one of my preferred build platforms it does the job well enough.
In addition Octopus Deploy is used as the automated deployment environment (more of that in the next post).
Let’s have a closer look at how Visual Studio projects are configured.
Visual Studio Project Configuration
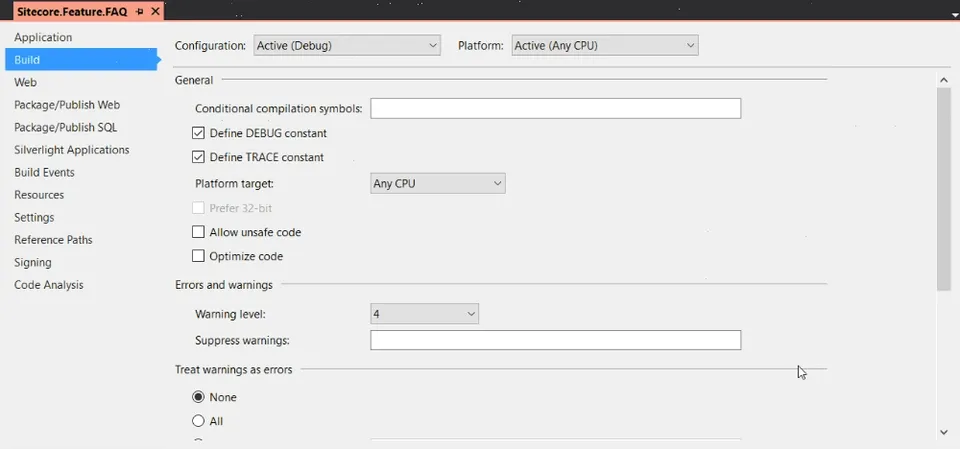
By default Visual Studio gives you two solution configurations: Debug and Release.
Depending on how you have your environment specific configuration setup you might have more configurations but our team only using these two now.
The Debug configuration is the default on during local development. The Release configuration is used for the centralized build (more on that later).
I noticed that even in Release mode *.pdb (symbol) files are created during a build.
If you want your release build to have a small footprint (and without debugging capabilities) you can disable to creation of these files by setting the DebugInfo to none under Build > Adanced…:
Packaging with Octopack
Octopus provides a very easy way of packaging a solution or projects as NuGet packages through the use of Octopack.
In our solution each Visual Studio project has a reference to Octopack.
This means that instead of one solution package there are be many packages (one per module).
This approach does has some drawbacks in the deployment process which I’m not too happy about as I will explain in the next post.
Nuspec
A nuspec file contains package metadata and specifies the folders & files will be included in a NuGet package. Octopack can use these nuspec files when NuGet packages are created.
However you don’t need to provide a nuspec file if you’re happy with what Visual Studio includes during a build (check the Build Action in the Properties pane if a file is included or not).
But if you want files included which are not included in Visual Studio projects, such as the serialized Sitecore yml files in our case, you need to explicitly add that to the nuspec file.
See line 15 in this nuspec template gist:
NamespacePrefix.ModuleType.Name.nuspec
<?xml version="1.0"?>
    <package xmlns="http://schemas.microsoft.com/packaging/2010/07/nuspec.xsd">
    <metadata>
        <id>_NamespacePrefix_._ModuleType_._Name_</id>
        <title>_NamespacePrefix_._ModuleType_._Name_</title>
        <version>$version$</version>
        <authors>_Company_</authors>
        <owners>_Company_</owners>
        <requireLicenseAcceptance>false</requireLicenseAcceptance>
        <description>_NamespacePrefix_._ModuleType_._Name_</description>
        <releaseNotes>Automatic build</releaseNotes>
        <copyright>Copyright 2016 _Company_</copyright>
    </metadata>
    <files>
        <file src="..\serialization\**" target="Unicorn\_ModuleType_\_Name_\serialization" />
        <!-- Only include roles when they are required per component.
        <file src="..\roles\**" target="Unicorn\_ModuleType_\_Name_\roles" />
        -->
    </files>
</package>
Three things might not be too obvious in this nuspec and are worth highlighting:
- You can move out of the project/solution directory by using the relative path notation
... - You need to type
**in order to include subfolder content. - I only added one
<file>line for the yml files. The standard build output from Visual Studio will also be packaged up but that is configured through a Octopack specific build parameter (OctoPackEnforceAddingFiles=true) which I’ll describe in the Build section in a moment.
Everything is setup now in Visual Studio. Let’s move on to the build server.
Bamboo
The build plans in are Bamboo are quite straightforward. A plan consists of one stage having one job which has the following three tasks:
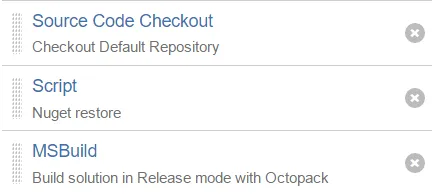
Currently there are two build plans:
- One which checks out the
developbranch and does a build inDebugconfiguration. This plan runs every 15 mins and when does a build when changes are detected in the repository. - One which checks out the
masterbranch and performs a build inReleaseconfiguration. This plan is triggered manually. During the build it will create NuGet packages and pushes them to an internal Octopus Deploy NuGet feed.
I just want to focus on building the solution in Release configuration since that part is different since we use the Helix approach nowadays.
Build, Package & Publish
The MSBuild task looks as follows:
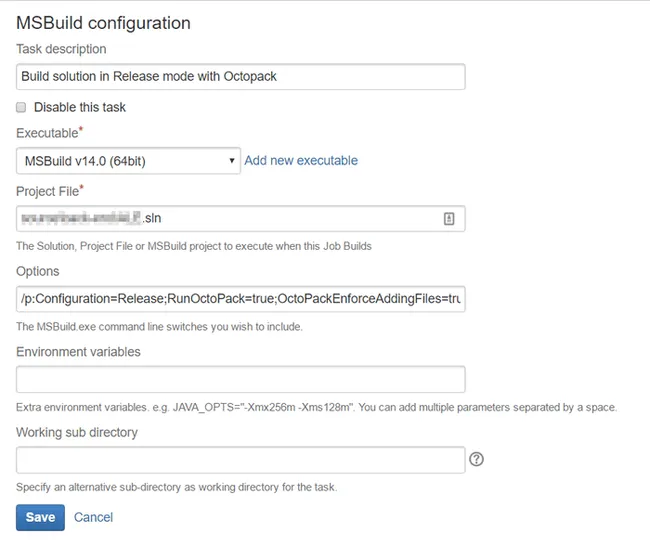
The Options field is the most interesting (I’ve replaced some sensitive info):
/p:Configuration=Release;RunOctoPack=true;OctoPackEnforceAddingFiles=true;OctoPackPackageVersion=1.0.${bamboo.buildNumber};OctoPackPublishPackageToHttp=<URL_TO_OCTOPUS_NUGET>;OctoPackPublishApiKey=<OCTOPUS_API_KEY>
Let’s have a detailed look at the build parameters:
Configuration=Releaseis obvious I hope.RunOctoPack=truemeans that Octopack will be run for each of the projects where it has been added as a NuGet reference.OctoPackEnforceAddingFiles=trueensures that the NuGet package contains both the build output files and the files specified in the nuspec.OctoPackPackageVersion=1.0.${bamboo.buildNumber}sets the version number of the NuGet package based on the Bamboo build number.OctoPackPublishPackageToHttp=<URL_TO_OCTOPUS_NUGET>defines the URL of the Octopus NuGet feed where created packages will be published to.OctoPackPublishApiKey=<OCTOPUS_API_KEY>contains the API key which is required when publishing to the Octopus NuGet feed.
Now we’re all set to run a build which will publish the NuGet packages for all the modules to Octopus Deploy.
In the next blogpost I’ll go into detail how the deployment process is setup in Octopus.
As already mentioned by my Sitecore community friend Akshay:
“I encourage you to discuss Helix/Habitat based conversations in the Sitecore Slack Helix-Habitat channel.”