
Supercharge your technical presentations with DemoTime
I’ve been doing technical presentations at conferences for over a decade now. I love doing these talks and improving my skills to deliver better presentations and demos.
Choosing the presentation tools
When it comes to the tools and format of my slides I started with reveal.js many years ago to have everything based on HTML and JavaScript for optimal portability on the web. A few years later I switched to hand-drawn slides using PowerPoint (drawn on my Surface laptop). Everyone loved the hand-drawn style, but it was very time-consuming to create them. The slides were also not very accessible since they were mostly exported as images, so I eventually stopped creating them. Regardless of the exact slide format, there was always a gap between showing the slides and running the demos, which I didn’t like.
IDE-first approach
Since all of my presentations involve demos, I was looking for a way to close the gap between showing slides, showing code, and running demos. Ideally I wanted to run the entire presentation inside an IDE. I’m a big fan of VSCode due to its extensibility and the fact that it runs on all platforms. So I looked into extensions that would allow me to create a presentation-like experience in VSCode.
The first solution I came across was CodeTour, a VSCode extension by Jonathan Carter that allows the creation of guided tours through a codebase in a git repo. The extension also supported running terminal commands, which was great for starting my demo applications. I used CodeTour for several years, and it worked well, although it had some limitations for the slides. Eventually the development of CodeTour stopped while VSCode continued to evolve, and my CodeTours were not working any longer 😢.
New kid on the block: DemoTime
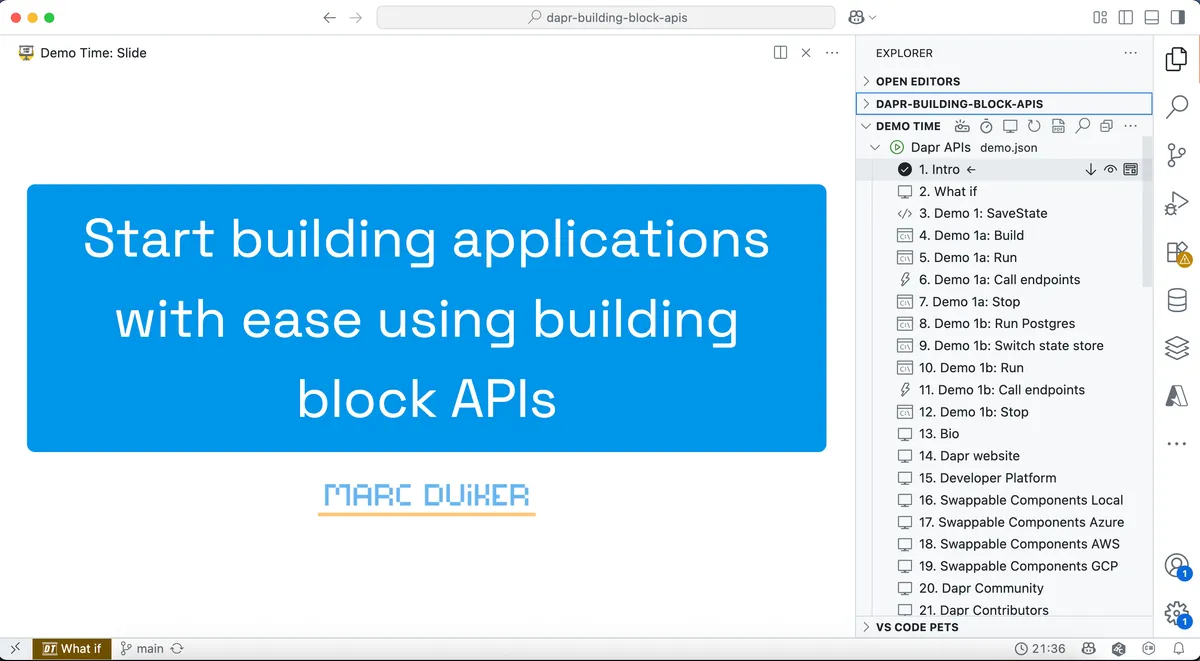
When I was looking for a CodeTour replacement, a fellow MVP and technical presenter, Elio Struyf, told me about a new VSCode extension he was working on called DemoTime. This extension was exactly what I was looking for! It enabled me to seamlessly mix markdown-based slides, show code, and run demos all from within VSCode. DemoTime is really powerful, and I typically describe it as a VSCode automation tool for technical presentations. Everything you can do using the VSCode command palette and the terminal, you can use in DemoTime to create stress-free technical presentations.
How I use DemoTime
My presentations typically follow this structure:
- Introduction: I start with a few slides to introduce the topic and myself.
- Show code: I show the code that I will be running in the demo and explain how it works.
- Run Demos: I run the demos, which are usually a web services, and I make API calls to them using the REST Client extension for VSCode, and point out log statements the services produce.
- Conclusion: I wrap up with a few slides to summarize the key points and provide additional resources and a call to action.
DemoTime allows me to do all of this from within VSCode and every step in the presentation is scripted, which helps me to stay focused and not forget any important points or actions.
The structure of a DemoTime presentation is captured in a json or yaml file stored in the .demo folder in the root of a git repo.
Here’s a snippet of a DemoTime presentation for one of my presentations:
{
  "$schema": "https://demotime.elio.dev/demo-time.schema.json",
  "title": "Dapr APIs",
  "description": "This presentation covers three Dapr APIs: State Management, Service Invocation, and Pub/Sub.",
  "version": 2,
  "demos": [
    {
      "title": "Intro",
      "description": "",
      "icons": {
        "start": "vm",
        "end": "pass-filled"
      },
      "steps": [
        {
          "action": "executeVSCodeCommand",
          "command": "workbench.action.terminal.killAll"
        },
        {
          "action": "executeVSCodeCommand",
          "command": "workbench.action.closeSidebar"
        },
        {
          "action": "openSlide",
          "path": "/.demo/slides/intro.md"
        }
      ]
    },
    ...
There’s an array of demo objects in the demos property that compose the presentation. Each demo contains a steps array that can include one or more steps. In the above example, the first demo is called “Intro” and it has three steps:
- Kill (and hide) all running VSCode terminals.
- Close the VSCode sidebar.
- Open the slide at
/.demo/slides/intro.md.
I’m mostly using these five action types in my DemoTime presentations:
openSlide: Opens a markdown file as a slide.markdownPreview: Opens a markdown file in the VSCode preview pane, which is great for showing a longer markdown document that does not fit the 16:9 slide ratio (e.g. a GitHub README).highlight: Opens a file in the editor, and highlights the specified row(s).executeVSCodeCommand: Executes a VSCode command, I typically use these to change the VSCode UI like showing or hiding panels, terminals, etc.executeTerminalCommand: Executes a command in the VSCode terminal, I use this to run demo applications.
There are many more actions available in DemoTime, check out the DemoTime documentation for more details.
Here’s an example of a DemoTime step that runs a terminal command to start Dapr applications using the Dapr CLI:
{
      "title": "Demo 1a: Run",
      "icons": {
        "start": "terminal-cmd",
        "end": "pass-filled"
      },
      "steps": [
        {
          "action": "executeTerminalCommand",
          "command": "dapr run -f .",
          "terminalId": "dapr-run"
        }
      ]
    },
Each time I run Dapr applications, I also want to stop running them once I’ve completed the demo. This is done by typing Ctrl+C in the terminal when using the Dapr CLI directly. Since I don’t want to type anything manually in the terminal during my demos, I had to figure out how to do this in DemoTime by using control characters in the command string. Here’s how I achieved that:
{
      "title": "Stop the apps 1",
      "icons": {
        "start": "terminal-cmd",
        "end": "pass-filled"
      },
      "steps": [
        {
          "action": "executeVSCodeCommand",
          "command": "workbench.action.terminal.sendSequence",
          "terminalId": "dapr-run",
          "args": {
            "text": "\u0003"
          }
        }
      ]
    },
The \u0003 command is the control character for end of text, which stops the running Dapr applications in the terminal.
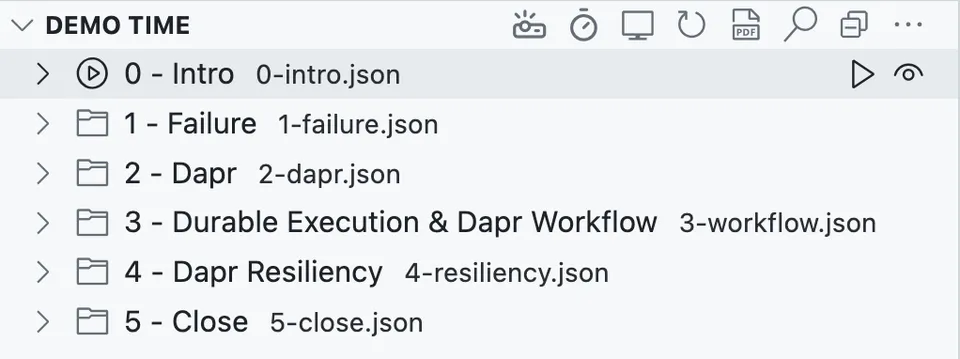
If you have a long presentation with many demos, the json file can get quite large. I recommend splitting the presentation into multiple DemoTime files. DemoTime will detect all json files in the .demo folder of the git repo and show all the demo steps in the DemoTime panel. This way, you can keep your presentation organized and manageable.
If editing json or yaml files manually is not your cup of tea, DemoTime now includes a visual editor that makes it much easier to get up and running with creating your first DemoTime presentation 🤩.
My impression and tips
I’ve given presentations using DemoTime at several conferences now and it worked flawlessly each time! 🚀
Here are the links to GitHub repos that contain my DemoTime-based presentations:
- Dapr Resiliency and Durable Execution
- Dapr Building Block APIs
- Dapr Pub/Sub Deepdive (work in progress)
I really like that the presentation content is part of the GitHub repo where the demos are located. I usually add a devcontainer configuration to my repos, so people can easily run everything, incl the DemoTime-based presentation, in a GitHub Codespace or locally in a container.
Here are some tips for using DemoTime:
I definitely recommend doing a couple of practice runs (this should be standard procedure when giving presentations anyway), especially if you include actions that automate VSCode or execute terminal commands.
Ensure your DemoTime presentation is robust and works as expected. What happens if you move back to a previous demo step and move forward again?
If you use DemoTime to create, rename, or edit files, make sure you get back in a clean state before you run the presentation again. You can either do a git reset or include a DemoTime step at the end to undo the changes you made.
Elio is continuously improving the extension and is always happy to receive feedback and take action on it. Give DemoTime a try and let Elio know what you think! And if you do like DemoTime, show some support and sponsor him on GitHub.